


Precision in plasma cutting hinges on the delicate balance between the torch and the workpiece. Whether you’re a seasoned fabricator or a hobbyist stepping into the world of CNC plasma cutting, understanding torch height control, plasma cutter setup, and the intricacies of the THC screen in Mach3 can make the difference between flawless cuts and costly errors.
Torch height control ensures the plasma torch maintains the optimal distance from the material, preventing issues like excessive dross, uneven edges, or premature consumable wear. Meanwhile, a proper plasma cutter setup lays the foundation for efficient operation, blending power settings, gas flow, and cutting speed. For those using Mach3, the THC screen settings become a critical interface for fine-tuning performance, while regular torch height control tests verify that your system operates at peak accuracy.
This guide dives deep into each of these essential topics, offering detailed insights to help you optimize your plasma cutting workflow. From configuring your THC in Mach3 to running diagnostic tests, we’ll explore the key steps that lead to cleaner cuts, longer consumable life, and a smoother machining experience. Let’s begin by unraveling the fundamentals of torch height control and why it’s the backbone of precision plasma cutting.
What Is Torch Height Control and Why Is It Crucial in Plasma Cutting?
Torch height control (THC) is a fundamental feature in CNC plasma cutting systems that automatically adjusts the distance between the plasma torch and the workpiece during operation. Maintaining the correct torch height is essential for achieving clean cuts, prolonging consumable life, and ensuring consistent performance. Without proper torch height control, operators risk poor cut quality, excessive slag, and even torch damage due to collisions with the material.
The primary function of torch height control is to compensate for variations in material surface conditions, such as warping, slag buildup, or uneven plate thickness. As the plasma torch moves across the metal, the THC system continuously monitors the arc voltage and adjusts the torch position in real time. This dynamic correction ensures that the arc length remains stable, which directly impacts cut precision and edge quality. A well-calibrated torch height control system can mean the difference between a smooth, dross-free cut and a jagged, unreliable edge.
Another critical aspect of torch height control is its role in the initial piercing phase. When the plasma arc first penetrates the metal, excessive torch height can lead to splatter and uneven starts, while insufficient height may cause the nozzle to clog or fail prematurely. Modern THC systems incorporate adaptive piercing techniques, lifting the torch to a safe height before descent to the optimal cutting distance. This not only protects consumables but also enhances overall cutting efficiency.
For operators using software like Mach3, integrating torch height control involves configuring the THC screen settings to match the plasma cutter’s voltage parameters and motion dynamics. Incorrect settings can lead to erratic torch behavior, such as unnecessary oscillations or delayed responses. Therefore, understanding how torch height control interacts with the CNC system is vital for seamless operation.
Finally, regular torch height control tests should be performed to verify system accuracy. These tests involve running calibration routines to ensure the THC responds correctly to voltage fluctuations and maintains consistent standoff distance. By prioritizing proper torch height control, plasma cutting professionals can achieve higher productivity, reduced waste, and superior cut quality in every project. Whether working with thin sheet metal or thick steel plate, mastering torch height control is a non-negotiable aspect of precision plasma cutting.
How to Properly Set Up a Plasma Cutter for Optimal Performance?
A well-configured plasma cutter is the backbone of efficient metal fabrication, delivering clean cuts, extended consumable life, and consistent results. The plasma cutter setup process involves multiple critical steps, from selecting the right power settings to ensuring proper gas flow and torch alignment. Neglecting any of these factors can lead to poor cut quality, excessive slag, or even equipment damage.
The first step in plasma cutter setup is choosing the correct amperage and voltage based on material type and thickness. Cutting too low on power can result in incomplete cuts and excessive dross, while excessive amperage may cause unnecessary wear on consumables and warping of thinner materials. Many modern plasma cutters feature automatic gas and amperage presets, but manual adjustments are often necessary for specialized applications. Matching the power settings to the job requirements ensures efficient energy use and optimal cut quality.
Gas selection and flow rate are equally crucial in plasma cutter setup. Different gases—such as air, oxygen, nitrogen, or argon-hydrogen mixtures—are used depending on the material being cut. For example, oxygen is ideal for carbon steel due to its exothermic reaction, while nitrogen or air is preferred for stainless steel and aluminum to prevent oxidation. The gas pressure must also be carefully regulated; too little flow fails to properly shield the arc, leading to contamination, while excessive pressure can disrupt the cutting process and waste resources.
Torch alignment and consumable condition play a significant role in plasma cutter setup. A misaligned torch or worn-out nozzle can cause uneven cuts, beveled edges, or erratic arc behavior. Before each cutting session, inspect the consumables for wear and ensure the torch is perpendicular to the workpiece. Some systems include a drag shield for contact cutting, while others rely on precise standoff distance maintained by torch height control. Proper torch setup minimizes rework and maximizes cutting efficiency.
Finally, integrating the plasma cutter with CNC controls—such as Mach3—requires synchronization between feed rate, arc voltage, and torch height adjustments. Incorrect feed speeds can result in excessive slag at low speeds or incomplete cuts at high speeds. Testing the setup on scrap material before full production helps fine-tune these parameters. By following a meticulous plasma cutter setup routine, operators can achieve precision cuts, reduce downtime, and extend the lifespan of their equipment. A well-tuned plasma cutter is not just a tool but a reliable partner in metal fabrication.
How to Configure the THC Screen in Mach3 for Precision Plasma Cutting?
The THC (Torch Height Control) screen in Mach3 serves as the command center for maintaining optimal torch-to-workpiece distance during plasma cutting operations. Properly configuring these settings is crucial for achieving clean cuts, minimizing consumable wear, and preventing torch crashes. Unlike generic CNC setups, plasma cutting requires dynamic height adjustments in real time, making the THC screen one of the most critical interfaces in Mach3 for plasma applications.
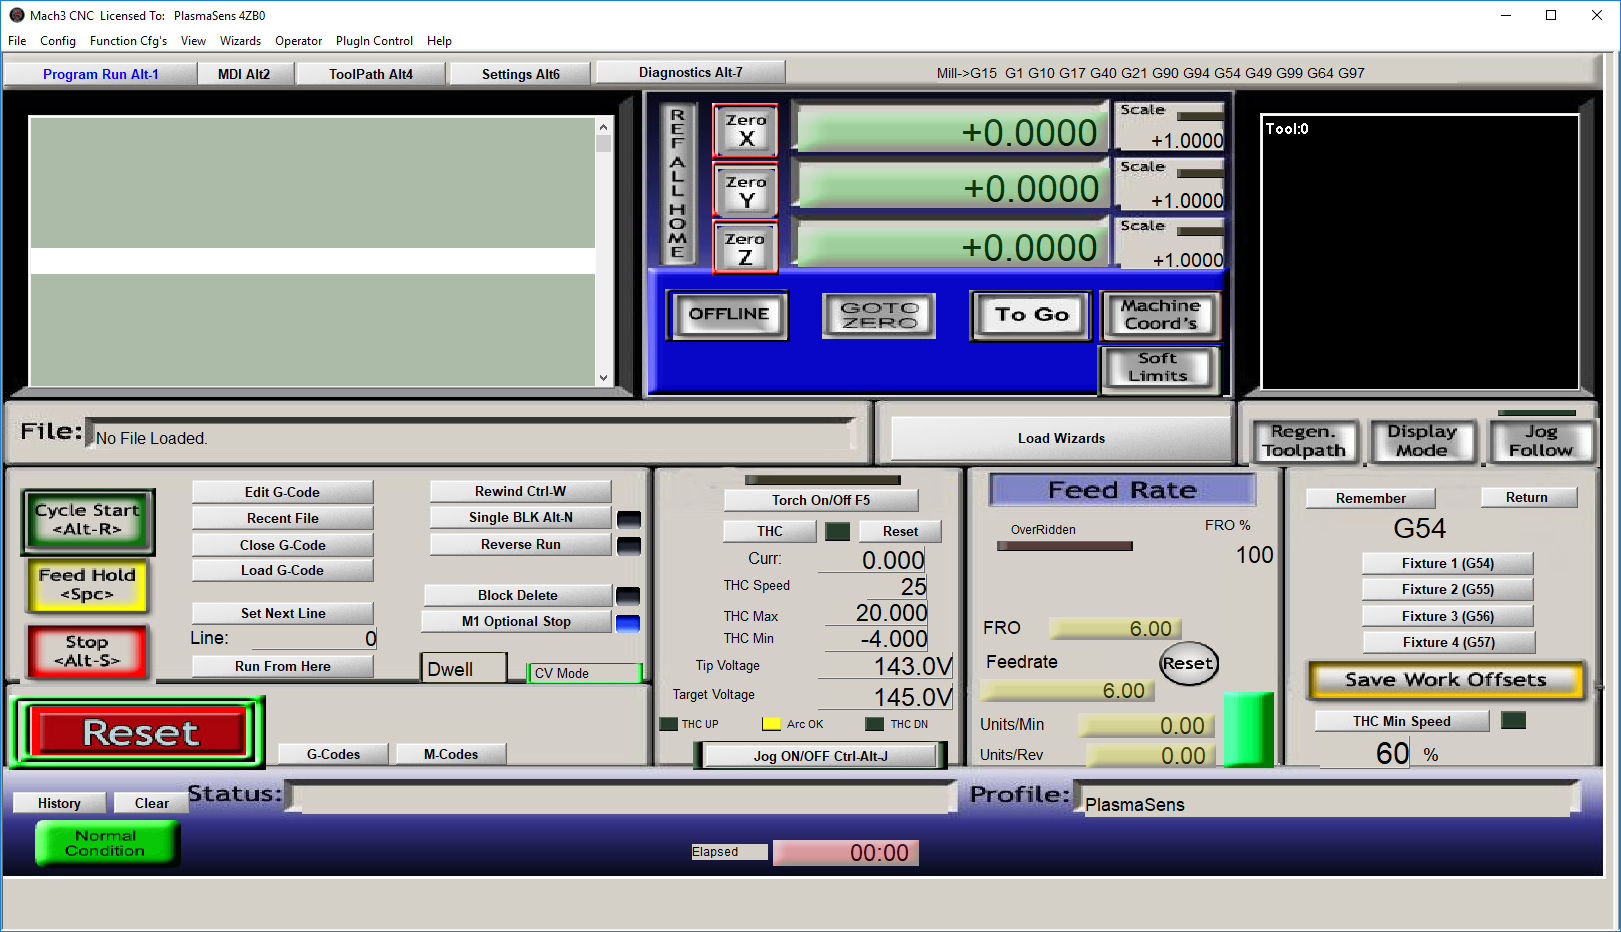
The first step in setting up the THC screen in Mach3 is establishing the correct voltage feedback parameters. Since torch height control operates by monitoring arc voltage—which fluctuates with distance from the material—the system must know the target voltage range for stable cutting. This value varies based on material thickness, amperage settings, and plasma gas type. Entering an incorrect reference voltage will cause the THC to overcorrect or undercorrect, leading to erratic torch movement. Many operators use manufacturer-provided voltage charts as a starting point before fine-tuning through test cuts.
Next, the THC screen requires configuration of motion control settings, including retract and dive speeds. These determine how aggressively the torch adjusts its height when the arc voltage deviates from the target. Too slow of a response allows poor cut quality during material warping, while excessive speed can induce mechanical oscillation. The “Delay Before THC Enable” parameter is equally important—it prevents premature height adjustments during piercing, where voltage stabilization takes a brief moment. Setting this delay too short risks torch collisions with molten metal splashback.
Another critical setting within the THC screen is the “Corner Lock” or “Anti-Dive” feature. Sharp corners and small curves cause natural voltage fluctuations that could trick the THC into unnecessary corrections. Enabling Corner Lock prevents torch height adjustments during directional changes, maintaining cut precision in intricate geometries. Similarly, the “THC ON/OFF” control allows operators to manually disable height adjustments for specific operations like marking or low-speed cuts where THC interference may be detrimental.
Finally, integrating the THC screen settings with the broader Mach3 profile ensures seamless operation. This includes verifying that motor tuning, axis limits, and feed rate overrides don’t conflict with THC commands. Regular validation through torch height control tests—observing how the system responds to deliberate material height variations—helps identify configuration gaps. When the THC screen in Mach3 is dialed in correctly, it becomes an invisible guardian, silently optimizing cut quality while operators focus on the broader fabrication process. Mastering these settings transforms a basic plasma cutter into a precision instrument capable of handling complex jobs with confidence.
How to Perform a Torch Height Control Test for Reliable Plasma Cutting?
A torch height control test is a diagnostic procedure that verifies whether your THC system responds accurately to changes in material height during plasma cutting. Conducting this test regularly ensures your system maintains optimal arc length, prevents torch crashes, and delivers consistent cut quality. Without proper validation, even a well-configured THC system might fail when encountering real-world variables like warped metal or uneven surfaces.
The first step in performing a torch height control test is setting up a controlled testing environment. Place a flat metal plate on your cutting table, ensuring it’s free of debris or warping that could skew results. If your system uses an initial height sensing method (like ohmic sensing or capacitive touch-off), verify that this pre-check sequence functions correctly before the arc starts. Some operators intentionally introduce a known variation—such as a shim or stepped material—to observe how the THC compensates.
Next, initiate a test cut with the THC activated, preferably on a straight-line path for easier observation. As the torch moves, manually induce a disturbance by placing a non-conductive spacer (like a ceramic tile or thick paper) under a portion of the plate. A properly functioning torch height control system should immediately detect the increased arc voltage from the elevated material and raise the torch to maintain the correct standoff distance. Conversely, when the torch returns to the unaltered section, it should smoothly lower back to the original height.
Monitoring the system’s response time is critical during a torch height control test. Laggy corrections indicate issues with voltage sampling speed or motion control settings in Mach3, while overactive oscillations suggest excessive gain in the THC loop. Advanced systems may log voltage feedback data during the test, allowing for post-analysis of the THC’s behavior. This data reveals whether adjustments are needed in parameters like retract speed or voltage averaging.
Finally, inspect the test cut for physical signs of THC performance. A consistent kerf width and minimal dross along the entire path confirm proper height control, while variations indicate where the system may have struggled. For added rigor, repeat the torch height control test with different material thicknesses and cutting speeds to simulate real job conditions. Incorporating these tests into regular maintenance not only prevents costly errors mid-production but also builds operator confidence in the system’s reliability. In plasma cutting, trust is built through verification—and nothing verifies like a thorough torch height control test.
the Essentials of Plasma Cutting Performance
Precision plasma cutting relies on the harmonious interaction of four critical elements: torch height control, proper plasma cutter setup, meticulous THC screen configuration in Mach3, and regular torch height control tests. Each component plays a distinct yet interconnected role in achieving clean cuts, maximizing consumable life, and ensuring operational safety.
Torch height control acts as the dynamic guardian of cut quality, automatically adjusting to material variations that would otherwise compromise results. A well-executed plasma cutter setup establishes the foundation, blending power, gas flow, and mechanical alignment into a cohesive system. The THC screen in Mach3 serves as the brains of the operation, translating voltage feedback into precise torch movements when calibrated correctly. Meanwhile, routine torch height control tests provide the necessary validation, exposing hidden issues before they escalate into production failures.
By investing time in understanding and optimizing these elements, operators transform their plasma cutting systems from basic tools into precision instruments. Whether tackling intricate artistic metalwork or high-volume industrial fabrication, this knowledge ensures consistent performance across all applications. The difference between acceptable and exceptional cuts often lies in the details—details that are now firmly under your control.
MATIJA ZAJŠEK, Mizarstvo.si
Latest posts by MATIJA ZAJŠEK, Mizarstvo.si (see all)
- Magneti Ljubljana: strokovno, industrijsko in razvojno središče magnetnih rešitev - december 2, 2025
- Garažna vrata po meri – kako izbrati vrata, ki odražajo vaš slog? - oktober 27, 2025
- “Maximizing Plasma Cutting Efficiency: THC Setup, Mach3 Configs, and Diagnostics” - avgust 7, 2025